|
|
Post by Barry on Dec 3, 2011 21:39:11 GMT
... Don't forget you can use SEP2 to improve colour shots too, by using the SEP layer method (introduced to us by Jiro)... And where is this method described that I can't find it, if you please Rob ?!  Just use Silver Efex Pro as normal, then when it opens up in Photoshop, change the layer blending mode to Luminosity. |
|
|
|
Post by Antonio Correia on Dec 3, 2011 21:41:11 GMT
And where is this method described that I can't find it, if you please Rob ?! Just use Silver Efex Pro as normal, then when it opens up in Photoshop, change the layer blending mode to Luminosity. Thank you Barry. I thought it would be something like that ... Have a nice week end I mean Sunday |
|
|
|
Post by robmarshall on Dec 3, 2011 21:46:26 GMT
... Don't forget you can use SEP2 to improve colour shots too, by using the SEP layer method (introduced to us by Jiro)... And where is this method described that I can't find it, if you please Rob ?! Can't find it now. But Jiro can probably point to it. basically... 1. Edit in RAW to make global adjustments. 2. Move to Photoshop 3. Start Silver Efex and add appropriate filter (I normally use High Structure) Return to PS. 4. new layer will be added for SEP convert. 5. Change blend mode to 'luminosity' which converts it back to colour but gives it (or should) a real kick! 6. You can adjust the effect if it is too much by lowering the opacity slider for the SEP layer. 7. Sharpen, dodge, burn etc. then flatten and sharpen. |
|
|
|
Post by jiro on Dec 3, 2011 21:48:22 GMT
Mr. King of Wales totally got it right, Antonio. Just follow the recipe. ;D
|
|
|
|
Post by Antonio Correia on Dec 3, 2011 22:10:55 GMT
This 20cFox doesn't stop to amaze me. One day a crazy avatar, the other a name discovered god knows where from... let's see what's next. Thank you Willie. I am almost diving into the software. Just reading and preparing. In fact, what the hell am I waiting for  @ Rob wherever he is, shaking his head or not: Your car was done this way wasn't it ? |
|
|
|
Post by Antonio Correia on Dec 3, 2011 23:56:21 GMT
Well, I am inside the trial days: 15. A shame that I can't buy directly from the US. Unless I create an adress what is not difficult after all. I think it is normal if I see too many options and adjustments and I have to opt for one or eventually for more in a more advanced position in the future. What I noticed at once: the program doesn't allow to magnify the screen. The letters are too small and hard to see sometimes in spite of the 27" screen. I went into 2 or 3 photos and could not get a very good result but I was able to understand how the interface is easy. It's a bit like LR so to say: panels on the right and left adjustments with sliders... My computer swallows his work with no problem and returns the results within a reasonable period of time. Now, it's time to zzzzzzzz. Good night all |
|
|
|
Post by robmarshall on Dec 4, 2011 6:43:00 GMT
What I noticed at once: the program doesn't allow to magnify the screen. The letters are too small and hard to see sometimes in spite of the 27" screen. There should be a button in the top right corner for magnification. There is also a navigator panel when you click on it. It may not be in the trial version. Also, if you select settings in bottom-left corner, you can set default zoom size. I have added Nik lessons to our fstop tutorials channel www.youtube.com/user/fstoptutorials on youtube. Just click on 'uploads' after selecting it from the subscriptions area, and you should get a list of all the lessons. This is the direct link to their channel www.youtube.com/user/NikSoftwareLessons?feature=watch |
|
|
|
Post by Antonio Correia on Dec 4, 2011 9:30:01 GMT
What I noticed at once: the program doesn't allow to magnify the screen. The letters are too small and hard to see sometimes in spite of the 27" screen. There should be a button in the top right corner for magnification. There is also a navigator panel when you click on it. It may not be in the trial version. Also, if you select settings in bottom-left corner, you can set default zoom size. I have added Nik lessons to our fstop tutorials channel www.youtube.com/user/fstoptutorials on youtube. Just click on 'uploads' after selecting it from the subscriptions area, and you should get a list of all the lessons. This is the direct link to their channel www.youtube.com/user/NikSoftwareLessons?feature=watchThank you Rob The videos I have seen them all.  Now I need some practice with a bit of you guys help. |
|
|
|
Post by Antonio Correia on Dec 4, 2011 12:01:39 GMT
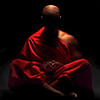
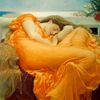
A quick one from this morning after say... 1 hour of experiments. With Jiro's method No crop done however... |
|
|
|
Post by Antonio Correia on Dec 4, 2011 12:09:14 GMT
Before and after  -  |
|
|
|
Post by robmarshall on Dec 4, 2011 12:51:37 GMT
Antonio (and everyone)
You live and learn each day don't you. I just discovered (by playing) that if you load an image in SEP you can magnify it using CTRL/- or CTRL/+ (that's probably CMD/-+ on a MAC). Having magnified, you can hold the spacebar and left-click and drag to move to another part of the image, without using the navigator panel. Doh! I need to bang my head on something...
|
|
|
|
Post by The Wirefox on Dec 4, 2011 14:43:51 GMT
I can confirm that cmd+ increases the magnification in the active window. To magnify the whole of the screen hold down the control key and use the mouse scroll wheel to zoom in and out.
Before all the rage of SEP I am sure Jiro had posted a method on another forum that basically went as follows (I use this with GIMP)
1. basic adjustments in raw converter (UFRaw in my case)
2. Create duplicate layer
3. Desaturate the duplicate layer (luminosity mode), adjust black and white points in levels and increase contrast as appropriate - I assume this is the bit which is substituted by the SEP adjustment layer?)
4. Set layer mode to 'overlay' or 'soft light'
5. Adjust opacity to desired effect
Is this essentially the same thing?
|
|
|
|
Post by Antonio Correia on Dec 4, 2011 20:18:06 GMT
Antonio (and everyone) You live and learn each day don't you. I just discovered (by playing) that if you load an image in SEP you can magnify it using CTRL/- or CTRL/+ (that's probably CMD/-+ on a MAC). Having magnified, you can hold the spacebar and left-click and drag to move to another part of the image, without using the navigator panel. Doh! I need to bang my head on something... Like when using CS ;D However, I - at this very moment - hesitate in spending this money. Is it really worth ? Just to take advantage of some presets and - very good - atributes of the plug-in ?! These are just doubts I have to solve in 14 days time. Perhaps these doubts are resulting from the relative weak results I get because I do not know enough of the software... Doubts, doubts ...  I also have to bang my head on something Rob. |
|
|
|
Post by Antonio Correia on Dec 4, 2011 20:20:07 GMT
I can confirm that cmd+ increases the magnification in the active window. To magnify the whole of the screen hold down the control key and use the mouse scroll wheel to zoom in and out. Before all the rage of SEP I am sure Jiro had posted a method on another forum that basically went as follows (I use this with GIMP) 1. basic adjustments in raw converter (UFRaw in my case) 2. Create duplicate layer 3. Desaturate the duplicate layer (luminosity mode), adjust black and white points in levels and increase contrast as appropriate - I assume this is the bit which is substituted by the SEP adjustment layer?) 4. Set layer mode to 'overlay' or 'soft light' 5. Adjust opacity to desired effect Is this essentially the same thing? I think so Steve. But let's wait until the others say something. Anyway, the results are very good in most images... |
|
|
|
Post by robmarshall on Dec 4, 2011 20:45:15 GMT
However, I - at this very moment - hesitate in spending this money. Is it really worth ? A subjective question, Antonio. they say a picture is worth a thousand words.  |
|