


Post by jeroenk on Dec 31, 2011 11:16:51 GMT
This tutorial is the second of a series of two tutorials which will focus on Black and White photography. This fist tutorial is about shooting BW images in particular and this second part will focus on the conversion from colour to BW in post processing. The first tutorial can be found here
The conversion
As stated in the previous tutorial colours and brightness values are two separate parts of an image. This means the easiest way to create a BW image is to simply throw away all the colour information. The only thing left is the brightness values, a BW image. But also stated in the previous tutorial is that colour information shouldn’t be thrown away while shooting because it’s very useful in post processing. This tutorial will focus on how to use this colour information in post processing to improve your BW photographs.
Colour filters
Commonly used equipment in BW photography, as well in the film days as in the digital conversion process, are colour filters. To know how to use them we need to know a little bit more how they work.
Where light can be interpreted as a bunch of waves, the waves have different wavelengths and intensities. A certain wavelength from incoming light is what our eye (and our camera) translates into a certain colour. Every colour or mixture of colours consists of a unique mixture of waves with different wavelengths.
A colour filter acts is a filter that blocks certain wavelengths and let others pass. For example a purely red colour filter blocks every colour of incoming light except the red light, therefore it looks red. When another colour hits this red filter, none of it will pass through the filter.
Whit a bit of knowledge about the colour circle this effect can be used to control contrast in BW conversion.

Subtractive Colour Scheme by Paul Torounet
This colour circle shows the primary colours: Magenta, yellow, cyan and the secondary colours: Red green and blue of the subtractive colour scheme. These primary colours are non complementary which means that each of them doesn’t contain any components of one another. In between there are the secondary colours. Each of these consists of a mixture of the two touching primary colours.
We saw earlier that a colour filter only allows a certain colour to pass through and blocks all the complementary colours completely. Off course no colour filter is perfect, nor consist a colour truly of that single colour only. But the complementary relationship between the filter colour and the incoming light colour will determine how much the incoming light will be blocked or how dark it’ll appear.
Using colour filters
Explained in the above is how a real, physical colour filter works. When applying a colour filter while shooting black and white the brigthness of a certain area in the photograph can be controlled. Basically you're using the colour information of the original photograph to control the brightness and contrast throughout the image.
This use of colour filters for BW photography was used a lot in the days of film photography. The colour filter adjusts the incoming colour information and a BW film captures the final outcome.
In digital post processing colour filters are also a commonly used tool. Although there isn’t any real colour filter applied while shooting, this is done whit some build in algorithms in Post Processing programs. When applying colour filters in BW processing on the bird statue from Part 1 of these tutorials it’ll look like this:
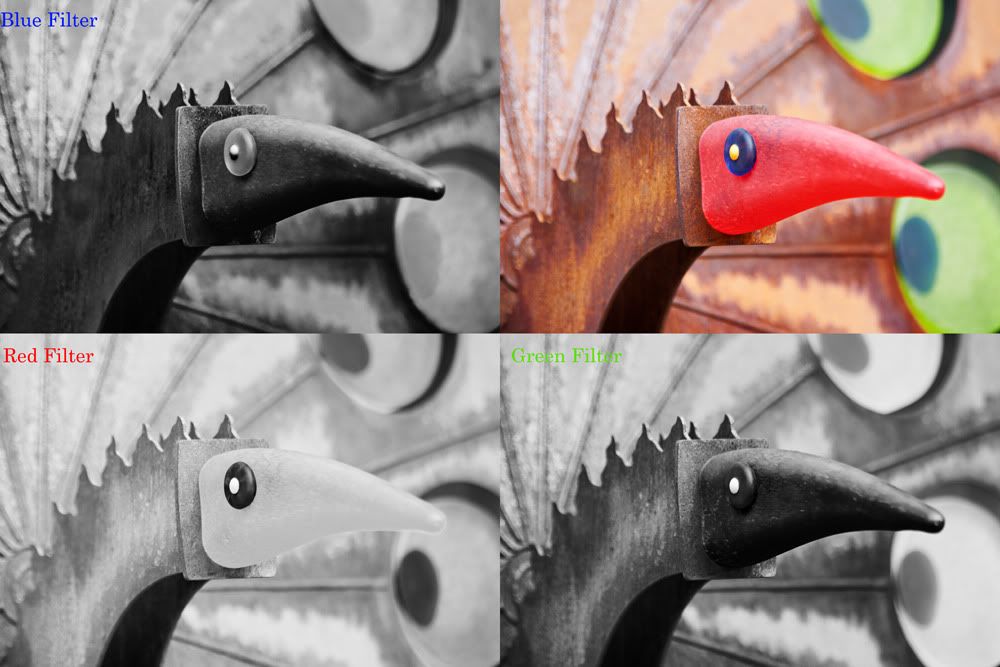
The bird statue converted by using a red, blue and green colour filter
Off course the choice for a certain colour filter depends on personal taste and the image you had in mind while shooting but there are a couple things to pay attention to.
Use of brightness and contrast
An interesting photograph has a distinct subject in it. The rest of the photograph is used to draw the viewer towards that subject. In BW conversion it important to realize that highlights naturally appeal to the human eye and these will therefore draw the viewers attention. Low Key photography is based on this principle. When there’s only a little bit of shadows in a photograph full of highlights it obviously works the other way around. This is used in High Key photography.
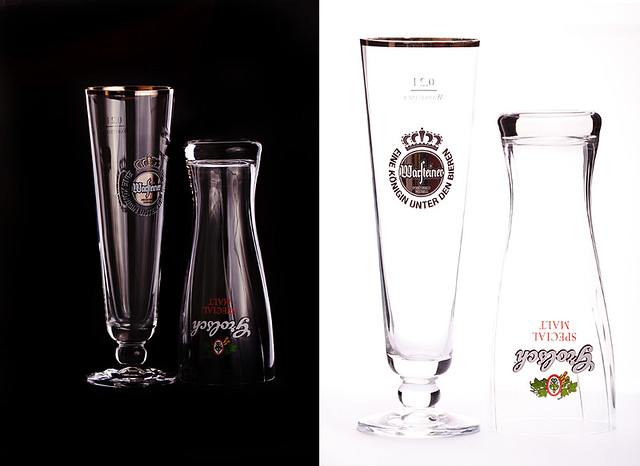
Comparising between a Low Key (L ) and High Key (R) image By Jeroen Knippenberg
As showed in the first tutorial of this series a rather gray image isn’t appealing. Contrast is an important tool for determining the mood of a photograph. Think about how differently you experience a dull misty day compared to a sunny one. Again the higher contrast draws a viewer’s eye more than a lower contrast does.
Conversion in Post Processing
In this section some BW conversion techniques in Adobe Photoshop CS5 and Silver Efex Pro will be discussed briefly. These programs are the only two I worked with. Feel free to suggest other programs and plug-ins.
Channel Mixer
In the Photoshop Channel Mixer you can alter per colour the amount of red, green or blue it consists of. Note that these primary colours are different than the ones discussed in the colour filter section. These colours are from the additive colour scheme which are from the RGB colour space you’re in. Whenever you change to CYMK colour space the channel mixer changes to Cyan, yellow, magenta and key.
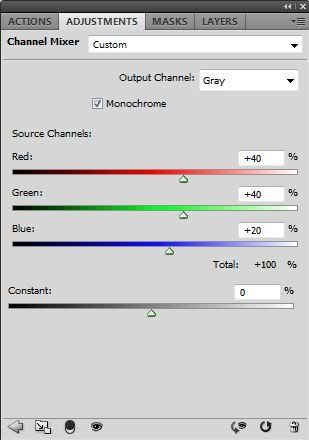
Adobe Photoshop Channel Mixer
When checking the monochrome box the Channel Mixer works as a filter for BW conversion. You can compose your own colour filter as if you’re screwing it in front of your lens.
I usually work in RGB colour space because a monitor works with this additive colour scheme. For printing I convert to CYMK after the conversion. (Though I’m not really an expert in printing and working with colour spaces).
BW adjustment layer
In Adobe Photoshop CS5 there’s a adjustment layer for BW conversion. It’s very similar to the channel mixer, but it works with the CYMK colours although you are in RGB colourspace.
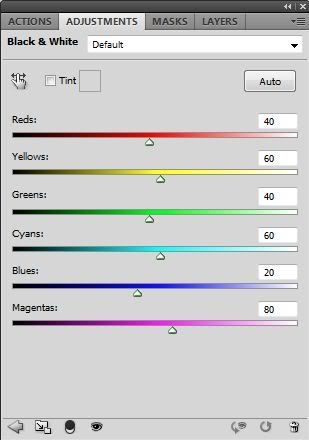
Adobe Photoshop BW adjustment layer
Furthermore there are some presets to mimic existing filters. You can also apply a tint to the BW image to go for a sepia look for example.
Silver Efex Pro
One of the most effective and flexible tools for BW conversion is the Silver Efex Pro series. Silver Efex Pro is basically a program fully designed for BW conversion with BW film processing in mind.
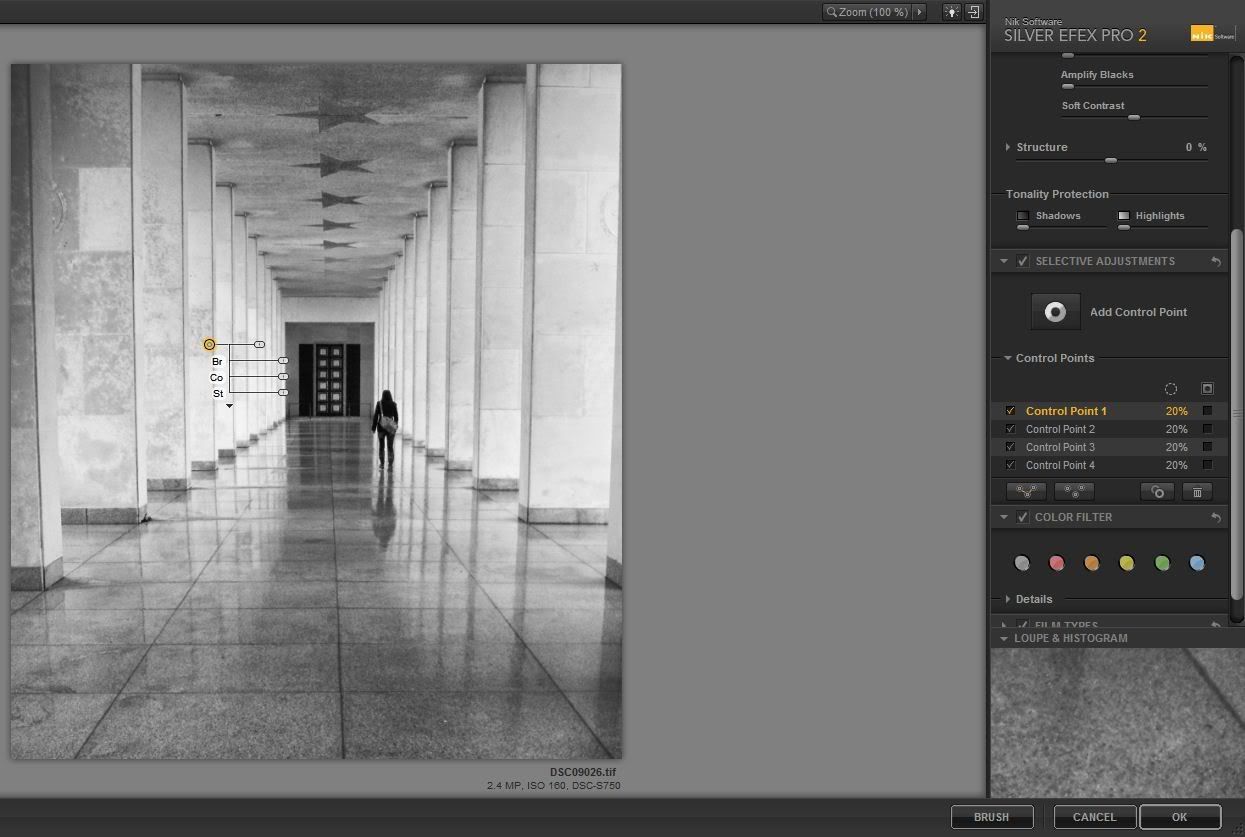
Silver Efex Pro II by NIK software
You could write a tutorial alone about SEP but in a nutshell it has the following functions:
Besides the colour filters the Selective adjustments is a very useful tool. It enables you to make adjustments (brightness, contrast and structure) to specific tonal areas within the image. This is a very powerful options which gives an enormous amount of control in the conversion process.
Whenever you’re serious about digital BW photography SEP or SEP II are very useful programs.
Combining Shooting with post processing
Up until here shooting and BW conversions are treated mostely separate but eventually a final image consists of a smooth compositions of the two. In post processing you’re more flexible in controlling the way your image looks but it’s very important to get it all as good as possible while shooting. Everything which isn’t there when shooting is very difficult to obtain in post processing. The Bird Statue photograph used in these tutorials is a good example. It isn't a very good subject for BW photograph because it's rather boring when it comes to brightness values. In order to get a proper BW image from it you have to create the contrast in the photograph yourself. Getting it right in the camera is especially important when it comes to lighting, exposure and composition of the image.
Quite often the best BW shots are taken from a scene which is closely to BW in the first place. The part of visualizing is much easier and it’s quite likely that BW suits the subject well.

Lily By Raylee aka Camellia
So far the tutorials about BW photography. I tried to cover the basic knowledge and techniques which enables you to apply your own vision into good BW images. All that’s left is practicing.
Make sure you post your BW images in the Monochrome section of this forum. The best way to improve your photography is discuss your photographs with other photographers and that’s what F-stop Café is all about.
The conversion
As stated in the previous tutorial colours and brightness values are two separate parts of an image. This means the easiest way to create a BW image is to simply throw away all the colour information. The only thing left is the brightness values, a BW image. But also stated in the previous tutorial is that colour information shouldn’t be thrown away while shooting because it’s very useful in post processing. This tutorial will focus on how to use this colour information in post processing to improve your BW photographs.
Colour filters
Commonly used equipment in BW photography, as well in the film days as in the digital conversion process, are colour filters. To know how to use them we need to know a little bit more how they work.
Where light can be interpreted as a bunch of waves, the waves have different wavelengths and intensities. A certain wavelength from incoming light is what our eye (and our camera) translates into a certain colour. Every colour or mixture of colours consists of a unique mixture of waves with different wavelengths.
A colour filter acts is a filter that blocks certain wavelengths and let others pass. For example a purely red colour filter blocks every colour of incoming light except the red light, therefore it looks red. When another colour hits this red filter, none of it will pass through the filter.
Whit a bit of knowledge about the colour circle this effect can be used to control contrast in BW conversion.
Subtractive Colour Scheme by Paul Torounet
This colour circle shows the primary colours: Magenta, yellow, cyan and the secondary colours: Red green and blue of the subtractive colour scheme. These primary colours are non complementary which means that each of them doesn’t contain any components of one another. In between there are the secondary colours. Each of these consists of a mixture of the two touching primary colours.
We saw earlier that a colour filter only allows a certain colour to pass through and blocks all the complementary colours completely. Off course no colour filter is perfect, nor consist a colour truly of that single colour only. But the complementary relationship between the filter colour and the incoming light colour will determine how much the incoming light will be blocked or how dark it’ll appear.
Using colour filters
Explained in the above is how a real, physical colour filter works. When applying a colour filter while shooting black and white the brigthness of a certain area in the photograph can be controlled. Basically you're using the colour information of the original photograph to control the brightness and contrast throughout the image.
This use of colour filters for BW photography was used a lot in the days of film photography. The colour filter adjusts the incoming colour information and a BW film captures the final outcome.
In digital post processing colour filters are also a commonly used tool. Although there isn’t any real colour filter applied while shooting, this is done whit some build in algorithms in Post Processing programs. When applying colour filters in BW processing on the bird statue from Part 1 of these tutorials it’ll look like this:
The bird statue converted by using a red, blue and green colour filter
Off course the choice for a certain colour filter depends on personal taste and the image you had in mind while shooting but there are a couple things to pay attention to.
Use of brightness and contrast
An interesting photograph has a distinct subject in it. The rest of the photograph is used to draw the viewer towards that subject. In BW conversion it important to realize that highlights naturally appeal to the human eye and these will therefore draw the viewers attention. Low Key photography is based on this principle. When there’s only a little bit of shadows in a photograph full of highlights it obviously works the other way around. This is used in High Key photography.
Comparising between a Low Key (L ) and High Key (R) image By Jeroen Knippenberg
As showed in the first tutorial of this series a rather gray image isn’t appealing. Contrast is an important tool for determining the mood of a photograph. Think about how differently you experience a dull misty day compared to a sunny one. Again the higher contrast draws a viewer’s eye more than a lower contrast does.
Conversion in Post Processing
In this section some BW conversion techniques in Adobe Photoshop CS5 and Silver Efex Pro will be discussed briefly. These programs are the only two I worked with. Feel free to suggest other programs and plug-ins.
Channel Mixer
In the Photoshop Channel Mixer you can alter per colour the amount of red, green or blue it consists of. Note that these primary colours are different than the ones discussed in the colour filter section. These colours are from the additive colour scheme which are from the RGB colour space you’re in. Whenever you change to CYMK colour space the channel mixer changes to Cyan, yellow, magenta and key.
Adobe Photoshop Channel Mixer
When checking the monochrome box the Channel Mixer works as a filter for BW conversion. You can compose your own colour filter as if you’re screwing it in front of your lens.
I usually work in RGB colour space because a monitor works with this additive colour scheme. For printing I convert to CYMK after the conversion. (Though I’m not really an expert in printing and working with colour spaces).
BW adjustment layer
In Adobe Photoshop CS5 there’s a adjustment layer for BW conversion. It’s very similar to the channel mixer, but it works with the CYMK colours although you are in RGB colourspace.
Adobe Photoshop BW adjustment layer
Furthermore there are some presets to mimic existing filters. You can also apply a tint to the BW image to go for a sepia look for example.
Silver Efex Pro
One of the most effective and flexible tools for BW conversion is the Silver Efex Pro series. Silver Efex Pro is basically a program fully designed for BW conversion with BW film processing in mind.
Silver Efex Pro II by NIK software
You could write a tutorial alone about SEP but in a nutshell it has the following functions:
- Brightness control in Highlights, midtones and shadows.
- Contrast control
- Colour filters
- Selective adjustments
- Mimic certain film type effects
- Finishing adjustments (toning, vignette, image borders)
Besides the colour filters the Selective adjustments is a very useful tool. It enables you to make adjustments (brightness, contrast and structure) to specific tonal areas within the image. This is a very powerful options which gives an enormous amount of control in the conversion process.
Whenever you’re serious about digital BW photography SEP or SEP II are very useful programs.
Combining Shooting with post processing
Up until here shooting and BW conversions are treated mostely separate but eventually a final image consists of a smooth compositions of the two. In post processing you’re more flexible in controlling the way your image looks but it’s very important to get it all as good as possible while shooting. Everything which isn’t there when shooting is very difficult to obtain in post processing. The Bird Statue photograph used in these tutorials is a good example. It isn't a very good subject for BW photograph because it's rather boring when it comes to brightness values. In order to get a proper BW image from it you have to create the contrast in the photograph yourself. Getting it right in the camera is especially important when it comes to lighting, exposure and composition of the image.
Quite often the best BW shots are taken from a scene which is closely to BW in the first place. The part of visualizing is much easier and it’s quite likely that BW suits the subject well.
Lily By Raylee aka Camellia
So far the tutorials about BW photography. I tried to cover the basic knowledge and techniques which enables you to apply your own vision into good BW images. All that’s left is practicing.
Make sure you post your BW images in the Monochrome section of this forum. The best way to improve your photography is discuss your photographs with other photographers and that’s what F-stop Café is all about.