Post by The Wirefox on Jan 22, 2012 19:50:23 GMT
I have had a couple of requests of how you would go about using Dave's (CannockWolf) black and white conversion method with GIMP. This was not as straightforward as I had hoped due to the fact that GIMP 2.6 does not have adjustment layers as you would recognise them in Photoshop. Still it was an interesting challenge.
Notes:
Obviously success with this method depends on the original capture and skill at painting painting through layers to selectively adjust exposure. My skills are pretty basic compared to Dave's so do not expect miracles it takes a lot of skill and practice to get to where Dave is. I have not selected a very dramatic scene for illustration purposes but it does help to show what you can do with some care.
Chris has talked to me about noise and the introduction of noise and other artifacts when he has tried this workflow in Photoshop. I have experienced the same thing with GIMP and as a first attempt they are present in the example I have used here. I am convinced now that this is due mainly to high gain introducing spurious edges when the adjustments via the layers are heavy handed. The other issue with using this method is potential for banding. again I suspect this is due to heavy adjustment when using the opacity slider as a means of controlling exposure and/or contrast. If you experience banding try applying a light monochromatic grain as a final layer.
Method
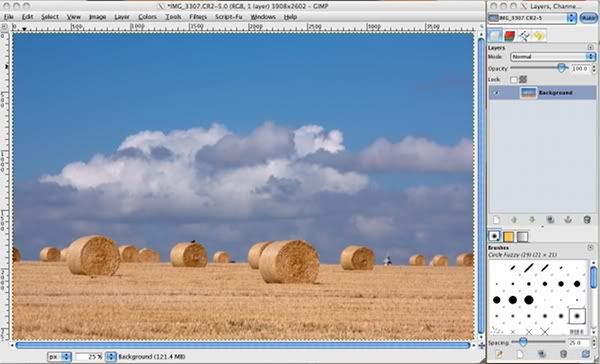
1. Start with your base colour image. Use your raw converter to get best overall exposure.
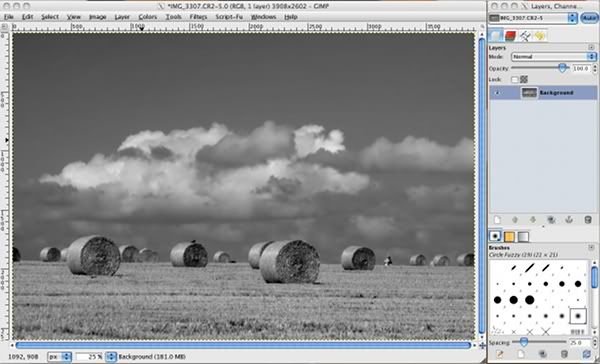
2. Desaturate the image. I have used Colours / Hue-Saturation. In the Hue-Saturation dialog drag the saturation slider to the left as far as it will go. This will give an uninspired conversion but it has the advantage of not sneaking in contrast and levels adjustment.
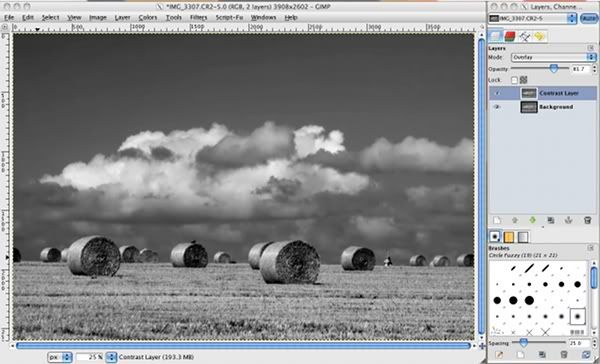
3. Next we create the equivalent of the Photoshop contrast adjustment layer. Duplicate the background layer with commands Layers / Duplicate Layers and set the layer mode to "Overlay" in the layers palette (shown at the right of the image below). The overlay mode will give you contrast adjustment control via opacity slider. Use the slider to get the contrast required. This is trial and error but beware of applying too much to quickly you can always introduce another contrast layer.
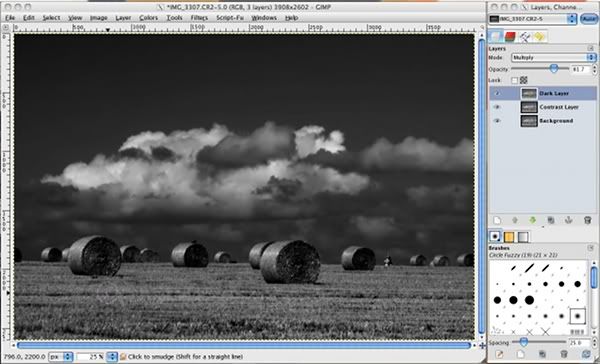
4. We can now add the 'Dark' layer. Again use commands Layers / Duplicate Layers. This time set the layer Mode to "Multiply". Multiply mode allows adjustment of exposure at the dark or black end of the tonal range. Use the opacity slider to make image as dark as you need to to get the resultant effect. I am going for an almost black sky so I have set the slider to achieve that.
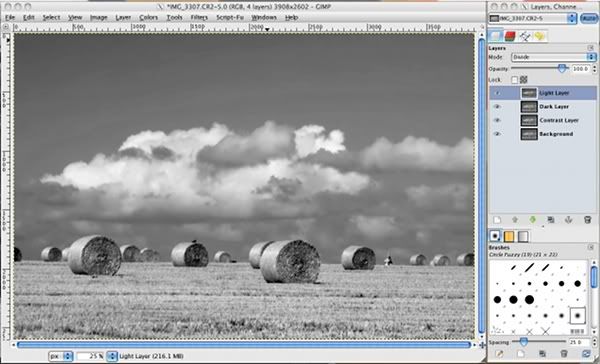
5. Next comes the "Light" layer. Use commands Layers / Duplicate Layers and set the layer mode to "Divide" Divide mode allows adjustment of exposure at the light or white end of the tonal range. Use the opacity slider to make image as light as you need to to get the resultant effect. I have not actually gone for an overexposed look here but for a more dramatic effect ensure the Light Layer is selected in the Layers palette and then open Levels. Use the levels slider to mimic over exposure. be careful here. sudden gradients will introduce banding and edge artifacts (see notes above)
6. We are now going to darken some areas of the image. Select the light layer at the top of the layer stack (it is highlighted in blue when selected). Right click and select Add Layer Mask from the drop down menu. This activates a dialog box. In the dialog box select the option that reads; White (Full Opacity) and click OK.
Select a soft edged brush of the appropriate size starting at low opacity 5-10%. this allows you to slowly build up the desired effect. Make sure the brush colour is set to black and carefully paint the areas of the image you wish to be darker.
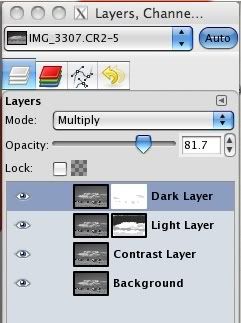
7. When finished you may want to lighten certain areas of the image. i lightened the bales and some of the clouds. In the layers palette and using the mouse grab the dark layer and drag it above the "Light" layer so that the dark layer now sits at the top of the layer stack.
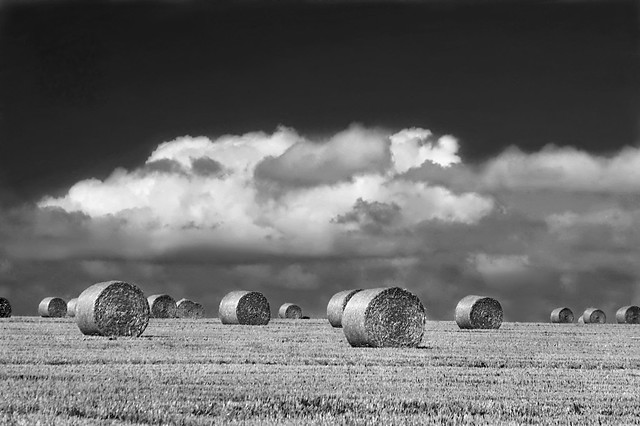
Repeat the method described in paragraph 6 above. This time painting only the areas you wish to lighten. Flatten the image (or save as .xcf if you wish to make adjustments later) and on the flattened copy apply un-sharp mask (USM) to sharpen the image. Do not overdo the sharpening as I have done as this will introduce edge artifacts. And thats it. Not in the Cannock Wolf league but I hope it illustrates the method
Notes:
Obviously success with this method depends on the original capture and skill at painting painting through layers to selectively adjust exposure. My skills are pretty basic compared to Dave's so do not expect miracles it takes a lot of skill and practice to get to where Dave is. I have not selected a very dramatic scene for illustration purposes but it does help to show what you can do with some care.
Chris has talked to me about noise and the introduction of noise and other artifacts when he has tried this workflow in Photoshop. I have experienced the same thing with GIMP and as a first attempt they are present in the example I have used here. I am convinced now that this is due mainly to high gain introducing spurious edges when the adjustments via the layers are heavy handed. The other issue with using this method is potential for banding. again I suspect this is due to heavy adjustment when using the opacity slider as a means of controlling exposure and/or contrast. If you experience banding try applying a light monochromatic grain as a final layer.
Method
1. Start with your base colour image. Use your raw converter to get best overall exposure.
2. Desaturate the image. I have used Colours / Hue-Saturation. In the Hue-Saturation dialog drag the saturation slider to the left as far as it will go. This will give an uninspired conversion but it has the advantage of not sneaking in contrast and levels adjustment.
3. Next we create the equivalent of the Photoshop contrast adjustment layer. Duplicate the background layer with commands Layers / Duplicate Layers and set the layer mode to "Overlay" in the layers palette (shown at the right of the image below). The overlay mode will give you contrast adjustment control via opacity slider. Use the slider to get the contrast required. This is trial and error but beware of applying too much to quickly you can always introduce another contrast layer.
4. We can now add the 'Dark' layer. Again use commands Layers / Duplicate Layers. This time set the layer Mode to "Multiply". Multiply mode allows adjustment of exposure at the dark or black end of the tonal range. Use the opacity slider to make image as dark as you need to to get the resultant effect. I am going for an almost black sky so I have set the slider to achieve that.
5. Next comes the "Light" layer. Use commands Layers / Duplicate Layers and set the layer mode to "Divide" Divide mode allows adjustment of exposure at the light or white end of the tonal range. Use the opacity slider to make image as light as you need to to get the resultant effect. I have not actually gone for an overexposed look here but for a more dramatic effect ensure the Light Layer is selected in the Layers palette and then open Levels. Use the levels slider to mimic over exposure. be careful here. sudden gradients will introduce banding and edge artifacts (see notes above)
6. We are now going to darken some areas of the image. Select the light layer at the top of the layer stack (it is highlighted in blue when selected). Right click and select Add Layer Mask from the drop down menu. This activates a dialog box. In the dialog box select the option that reads; White (Full Opacity) and click OK.
Select a soft edged brush of the appropriate size starting at low opacity 5-10%. this allows you to slowly build up the desired effect. Make sure the brush colour is set to black and carefully paint the areas of the image you wish to be darker.
7. When finished you may want to lighten certain areas of the image. i lightened the bales and some of the clouds. In the layers palette and using the mouse grab the dark layer and drag it above the "Light" layer so that the dark layer now sits at the top of the layer stack.
Repeat the method described in paragraph 6 above. This time painting only the areas you wish to lighten. Flatten the image (or save as .xcf if you wish to make adjustments later) and on the flattened copy apply un-sharp mask (USM) to sharpen the image. Do not overdo the sharpening as I have done as this will introduce edge artifacts. And thats it. Not in the Cannock Wolf league but I hope it illustrates the method