


Post by jeroenk on Sept 27, 2011 21:59:49 GMT
Since Muckergee asked me for some more info about the use of a 10 stops ND filter I’ll go a bit deeper into the subjectmatter of long exposures in this tutorial
Why using long exposures in the first place?
Since photography is a visual medium maing use of only a single image, capturing time and impressions of time (e.g. speed) should all be done within that single image. Using the shutterspeed/exposure length of your camera is a very good tool for giving the viewer this sense of time.
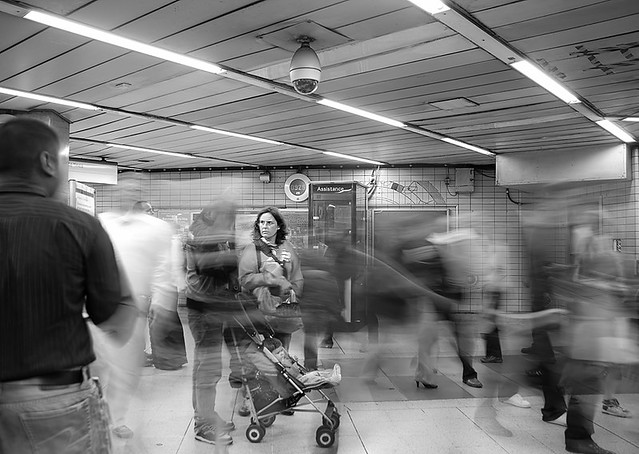
By Jeroen Knippenberg - 1s f/11 ISO100 18mm
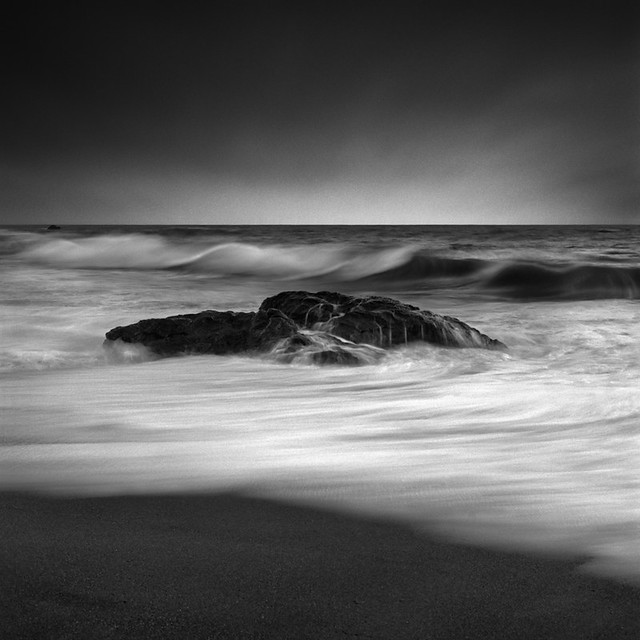
Long exposures are quite often used in landscape and architecture photography to give a surreal look to images by washing out water and cloud textures .

By Colin Southern - 59s f/16 ISO50 24mm
Where mostly the rather extreme exposure times will create this sense of time I’ll be focusing in this tutorial on the long exposures and leaving the freezing action of very short exposures out.
Choosing the right ND filter
When trying to shoot a long exposure in broad daylight you’ll immediately find whichever camerasettings you use (choosing a very tiny aperture and the lowest ISO settings) it still doesn’t give you the desired exposure length. For this purpose the Neutral Density (ND) filters are created. Basically these filters are nothing more than a dark piece of glass that you can put in front of your camera lens.

BW ND 3.0 (110)
Filter factors
Available are ND filters with different filter factors. A bit confusing is that different manufacturers use different names and numbers for these factors. The easiest way to describe the filter factors is by giving the amount of stops they darken the incoming light (A stop is a photographers term for halving or doubling the amount of light). With these stops you can calculate a filter factor. Besides that manufacturers have also coupled a optical density to those filter factors. The table below puts it all together:

By BW Vision
With this table and some arithmetic you can choose a filter by using the following formula:
Filterfactor=Prefered Shutterspeed/Metered shutterspeed
Eg. If you have a camera metering 1/100s f/11 ISO 100 and you’d like a exposure time of 10s you’d need a ND 3.0:
Prefered Shutterspeed/Metered shutterspeed=10/0.01=1000
Filter types
For most of the ND filter brands there are a couple different types:
Singh ray Vari ND
[/li][/ul]
Each filter or filter system has its own advantages and disadvantages. Generally speaking the screw in filters are the cheapest and easy to pack. Though the disadvantages are that you need a different filter for each lens size (or an adapter if possible) and vignetting will be a problem when stacking multiple filters.
The filter holder system is great when combining different filters like a graduated ND filter or a linear polarizer with the ND filter because you simply slide them in a different slot in front of each other. Besides you only have to change the systems adapter when mounting it on a different lens. These systems are more expensive than the screw versions but much more flexible when using it for stacking filters.
With a variable ND filter you’ll never have to choose between filter factors and you have full control of your camera settings without compromises. Though therefore are these variable filters the most expensive ones.
Choosing the right filter is all about what suits your needs.
Using the filter ‘in the field’
When using a ND filter in the field there are some things to take care of and some handy tips and tricks I’d like to mention.
Camera shake
It might sounds obvious but a stable tripod is the key to sharp long exposure pictures. I quite often hang my bag with camera gear as a weight on the tripod to get it even sturdier.
Pre-metering and focusing
When screwing on a 10 stops ND filter your viewfinder becomes too dark to see what you’re shooting. Also when exceeding the 30s exposure time limit your camera won’t be able to do the metering itself. Therefore you have to setup your camera before screwing on the filter.
My routine when doing a long exposure is as following:
Dependant on your filters filter factor pre-metering and -focusing might be or be not necessary.
A very handy bypass for the exposure calculations is rather easy. In your camera menu you can set your camera to 1/3 stop increments (or ½ stop increments). When using a ten stop ND filter all you have to do is turn the dial on your camera 10x3 times and you’re at your desired exposure. 1/3 stop increments is preferable to me because with one movement of my finger I move the dial 3 clicks.
Using the Bulb modus
When doing a long exposure you might exceed the 30s exposure time the camera can measure. Therefore your camera has the Bulb modus. It’s ‘one click further’ than the 30s in your cameras manual menu. The exposure time in this modus is simply as long as you keep the shutter button pressed.
To avoid camera shake when keeping your shutter button pressed there are remote controls available which you can lock.

Canon remote control
When doing a exposure over 30s it’s a good idea to cover up your viewfiner while doing the exposure to prevent light from falling through the viewfinder on your sensor while exposing.
Do’s and don’ts
To start with the do’s:
Experiment with different shutterspeeds, as much as you can with your chosen filter. Completely washing out the water in a seascape can give great results, but a shorter exposure can also work very well.
by maxxsmart - 1/2s f/16 ISO100 80mm
Use a polarizer in combination with your ND filter. A polarizer helps controlling contrast in water and skies (exactly the interesting parts of an image when using long exposures). Besides that a polarizer cuts down the incoming light by approximately 2 stops.
The common, and biggest mistake when doing long exposures (I’m no exception for this is using long exposures as a kind of magic wand for wonderful pictures. A long exposure can create a great atmosphere in your photograph but it is by no means a guarantee for a good picture, just by using this technique. Use it as an addition to a good composition, beautiful light and a suiting scene and it certainly will improve your photograph.
![]() farm7.static.flickr.com/6193/6092532709_93afbe2792_z.jpg [/img]
farm7.static.flickr.com/6193/6092532709_93afbe2792_z.jpg [/img]
By Jeroen Knippenberg - 60 s f/16 ISO100 19mm
Some inspiration
For me a very inspiring Long Exposure artist is Joel Tjintjelaar. Make sure you have a look on his site. Here you'll find some very interesting tutorials and a beautiful gallery. There's a very interesting video about him I'd like to share with you.
That's it for now. Comments on the tutorial, as well as improvement suggestions and discussion about remaining questions are very welcome in this thread. So let me know what you think
Why using long exposures in the first place?
Since photography is a visual medium maing use of only a single image, capturing time and impressions of time (e.g. speed) should all be done within that single image. Using the shutterspeed/exposure length of your camera is a very good tool for giving the viewer this sense of time.
By Jeroen Knippenberg - 1s f/11 ISO100 18mm
Long exposures are quite often used in landscape and architecture photography to give a surreal look to images by washing out water and cloud textures .
By Colin Southern - 59s f/16 ISO50 24mm
Where mostly the rather extreme exposure times will create this sense of time I’ll be focusing in this tutorial on the long exposures and leaving the freezing action of very short exposures out.
Choosing the right ND filter
When trying to shoot a long exposure in broad daylight you’ll immediately find whichever camerasettings you use (choosing a very tiny aperture and the lowest ISO settings) it still doesn’t give you the desired exposure length. For this purpose the Neutral Density (ND) filters are created. Basically these filters are nothing more than a dark piece of glass that you can put in front of your camera lens.
BW ND 3.0 (110)
Filter factors
Available are ND filters with different filter factors. A bit confusing is that different manufacturers use different names and numbers for these factors. The easiest way to describe the filter factors is by giving the amount of stops they darken the incoming light (A stop is a photographers term for halving or doubling the amount of light). With these stops you can calculate a filter factor. Besides that manufacturers have also coupled a optical density to those filter factors. The table below puts it all together:
By BW Vision
With this table and some arithmetic you can choose a filter by using the following formula:
Filterfactor=Prefered Shutterspeed/Metered shutterspeed
Eg. If you have a camera metering 1/100s f/11 ISO 100 and you’d like a exposure time of 10s you’d need a ND 3.0:
Prefered Shutterspeed/Metered shutterspeed=10/0.01=1000
Filter types
For most of the ND filter brands there are a couple different types:
- Screw in filters: these filters (like the B+W filter above) can be screwed directly on to the lens like a regular UV filter.
- Filter holder system: Brands like Lee and Cokin use a slide in system for square filters like used in cinematography.

The Cokin system - Variable ND filters: these filters are mostly screw in filters and they have a variable filter factor which you can change by turning the filter (like a circular polarizing filter).
pixsylated.com/wp-content/uploads/2008/06/singh-ray-vari-nd-filter.png
Singh ray Vari ND
[/li][/ul]
Each filter or filter system has its own advantages and disadvantages. Generally speaking the screw in filters are the cheapest and easy to pack. Though the disadvantages are that you need a different filter for each lens size (or an adapter if possible) and vignetting will be a problem when stacking multiple filters.
The filter holder system is great when combining different filters like a graduated ND filter or a linear polarizer with the ND filter because you simply slide them in a different slot in front of each other. Besides you only have to change the systems adapter when mounting it on a different lens. These systems are more expensive than the screw versions but much more flexible when using it for stacking filters.
With a variable ND filter you’ll never have to choose between filter factors and you have full control of your camera settings without compromises. Though therefore are these variable filters the most expensive ones.
Choosing the right filter is all about what suits your needs.
Using the filter ‘in the field’
When using a ND filter in the field there are some things to take care of and some handy tips and tricks I’d like to mention.
Camera shake
It might sounds obvious but a stable tripod is the key to sharp long exposure pictures. I quite often hang my bag with camera gear as a weight on the tripod to get it even sturdier.
Pre-metering and focusing
When screwing on a 10 stops ND filter your viewfinder becomes too dark to see what you’re shooting. Also when exceeding the 30s exposure time limit your camera won’t be able to do the metering itself. Therefore you have to setup your camera before screwing on the filter.
My routine when doing a long exposure is as following:
- Choose the scene and set up the tripod
- Choose the composition, depth of field and the focal point (and switch of autofocus afterwards!).
- Meter the incoming light at aperture priority
- Dial these metered settings into the manual menu
- Screw on the ND filter; and last but not least,
- Take the shot
Dependant on your filters filter factor pre-metering and -focusing might be or be not necessary.
A very handy bypass for the exposure calculations is rather easy. In your camera menu you can set your camera to 1/3 stop increments (or ½ stop increments). When using a ten stop ND filter all you have to do is turn the dial on your camera 10x3 times and you’re at your desired exposure. 1/3 stop increments is preferable to me because with one movement of my finger I move the dial 3 clicks.
Using the Bulb modus
When doing a long exposure you might exceed the 30s exposure time the camera can measure. Therefore your camera has the Bulb modus. It’s ‘one click further’ than the 30s in your cameras manual menu. The exposure time in this modus is simply as long as you keep the shutter button pressed.
To avoid camera shake when keeping your shutter button pressed there are remote controls available which you can lock.
Canon remote control
When doing a exposure over 30s it’s a good idea to cover up your viewfiner while doing the exposure to prevent light from falling through the viewfinder on your sensor while exposing.
Do’s and don’ts
To start with the do’s:
Experiment with different shutterspeeds, as much as you can with your chosen filter. Completely washing out the water in a seascape can give great results, but a shorter exposure can also work very well.
by maxxsmart - 1/2s f/16 ISO100 80mm
Use a polarizer in combination with your ND filter. A polarizer helps controlling contrast in water and skies (exactly the interesting parts of an image when using long exposures). Besides that a polarizer cuts down the incoming light by approximately 2 stops.
The common, and biggest mistake when doing long exposures (I’m no exception for this
 is using long exposures as a kind of magic wand for wonderful pictures. A long exposure can create a great atmosphere in your photograph but it is by no means a guarantee for a good picture, just by using this technique. Use it as an addition to a good composition, beautiful light and a suiting scene and it certainly will improve your photograph.
By Jeroen Knippenberg - 60 s f/16 ISO100 19mm
Some inspiration
For me a very inspiring Long Exposure artist is Joel Tjintjelaar. Make sure you have a look on his site. Here you'll find some very interesting tutorials and a beautiful gallery. There's a very interesting video about him I'd like to share with you.
That's it for now. Comments on the tutorial, as well as improvement suggestions and discussion about remaining questions are very welcome in this thread. So let me know what you think