Post by Stevewebb on Oct 29, 2012 9:29:31 GMT
Levels Adjustments in Photoshop
A different tutorial covered using levels in Camera Raw. The levels tool can used within Photoshop, with just a few more steps to get the same effect.
First open your image.

If you have never used the Levels Tool before then the first thing we should do is set some default values for the black and white points. You only have to do this once as photoshop will remember for next time.
Go to Image > Adjustments > Levels…

The Levels dialog box will appear. On the right hand side you will see three eyedroppers. Double click the one on the right hand side. This is the white eyedropper.

This brings up the colour picker box. Towards the bottom right hand side of the box you will see the RGB values set at R=255, G=255, B=255. Go ahead and change each value to 245. The reason for this is to retain at least some detail even in the brightest parts of our images rather than having pure “paper” white as the previous values would be. Then click OK to come out of the colour picker.

Then double click on the left hand eyedropper, the blacks eyedropper.

The colour picker box will appear as before. This time change the RGB values to R=7, G=7, B=7. Again this helps to retain detail in our image but this time in the darkest parts. Click OK to exit the colour picker and then click OK to exit the levels dialog box.

A box will appear asking if you wish to save the new settings as defaults, click Yes and then you won’t have to go through these steps again next time.
Now its time to start using the levels tool to fix our image. We will start with the highlights, but before we can fix the highlights, we need to know where they are so for that we use the Threshold Tool.
Click on Layer > New Adjustment Layer > Threshold

When the Threshold dialog box appears drag the slider all the way to the right and the whole image will go black. Then slowly drag it back to the left until you see the first bits of white start to appear. These are the brightest parts of our image and will be used to set the white point.

Now we need to place a marker so that we can find this brightest part again when we need to.
Place the cursor over the white area and hold down the ALT +SHIFT keys and left click. This will place a marker with a tiny 1 next to it at that point.

Now we go back to the Threshold values and drag the slider all the way to the left. The whole image will now turn white. Slowly drag the slider back towards the right until some areas of black start to appear. These are the darkest parts of the image and will be used to set the black point.

As before, we need to mark this point by holding down the ALT + SHIFT keys and left click. A marker will be placed with a tiny number 2 next to it.
Now we can delete the threshold layer by right clicking on the layers palette and selecting delete layer. You will see the markers you placed showing on your original image.

Now we need to add the levels adjustment layer to make the magic happen. Go to Layer > New Adjustment Layer > Levels…

This brings up the levels dialog box just like it did right at the start of this tutorial. But this time it is an adjustment layer. You should still be able to see the two markers that we placed earlier too.
Simply click once on the white eyedropper to select it and then click inside the 1st Marker, then select the black eyedropper and click inside the second marker.
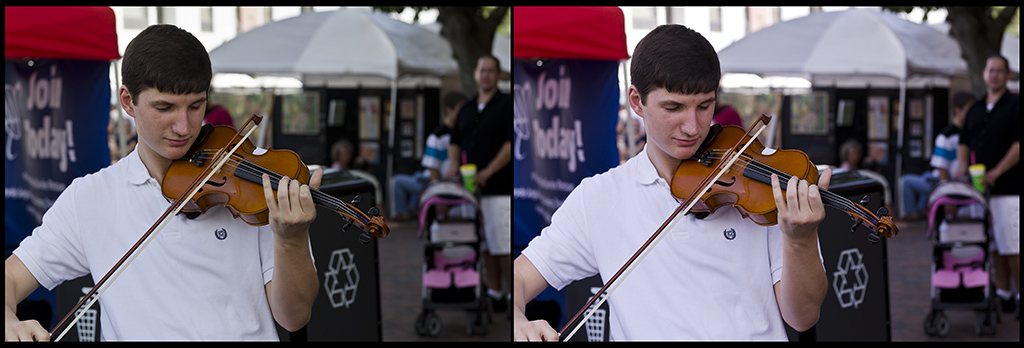
You should instantly see your image POP.

To remove the markers that we placed. Choose the colour sampler tool from the tool bar. It may be hiding by default underneath the eyedropper tool. Simply right click on it and select the colour sampler tool. On the menu bar at the top of the screen click the “Clear” button and the markers will go.

Hey Presto, the levels adjustment is complete.

A different tutorial covered using levels in Camera Raw. The levels tool can used within Photoshop, with just a few more steps to get the same effect.
First open your image.
If you have never used the Levels Tool before then the first thing we should do is set some default values for the black and white points. You only have to do this once as photoshop will remember for next time.
Go to Image > Adjustments > Levels…
The Levels dialog box will appear. On the right hand side you will see three eyedroppers. Double click the one on the right hand side. This is the white eyedropper.
This brings up the colour picker box. Towards the bottom right hand side of the box you will see the RGB values set at R=255, G=255, B=255. Go ahead and change each value to 245. The reason for this is to retain at least some detail even in the brightest parts of our images rather than having pure “paper” white as the previous values would be. Then click OK to come out of the colour picker.
Then double click on the left hand eyedropper, the blacks eyedropper.
The colour picker box will appear as before. This time change the RGB values to R=7, G=7, B=7. Again this helps to retain detail in our image but this time in the darkest parts. Click OK to exit the colour picker and then click OK to exit the levels dialog box.
A box will appear asking if you wish to save the new settings as defaults, click Yes and then you won’t have to go through these steps again next time.
Now its time to start using the levels tool to fix our image. We will start with the highlights, but before we can fix the highlights, we need to know where they are so for that we use the Threshold Tool.
Click on Layer > New Adjustment Layer > Threshold
When the Threshold dialog box appears drag the slider all the way to the right and the whole image will go black. Then slowly drag it back to the left until you see the first bits of white start to appear. These are the brightest parts of our image and will be used to set the white point.
Now we need to place a marker so that we can find this brightest part again when we need to.
Place the cursor over the white area and hold down the ALT +SHIFT keys and left click. This will place a marker with a tiny 1 next to it at that point.
Now we go back to the Threshold values and drag the slider all the way to the left. The whole image will now turn white. Slowly drag the slider back towards the right until some areas of black start to appear. These are the darkest parts of the image and will be used to set the black point.
As before, we need to mark this point by holding down the ALT + SHIFT keys and left click. A marker will be placed with a tiny number 2 next to it.
Now we can delete the threshold layer by right clicking on the layers palette and selecting delete layer. You will see the markers you placed showing on your original image.
Now we need to add the levels adjustment layer to make the magic happen. Go to Layer > New Adjustment Layer > Levels…
This brings up the levels dialog box just like it did right at the start of this tutorial. But this time it is an adjustment layer. You should still be able to see the two markers that we placed earlier too.
Simply click once on the white eyedropper to select it and then click inside the 1st Marker, then select the black eyedropper and click inside the second marker.
You should instantly see your image POP.
To remove the markers that we placed. Choose the colour sampler tool from the tool bar. It may be hiding by default underneath the eyedropper tool. Simply right click on it and select the colour sampler tool. On the menu bar at the top of the screen click the “Clear” button and the markers will go.
Hey Presto, the levels adjustment is complete.